


Have you ever bitten into a cookie that was so soft it practically melted, but still had that perfect “pull” when you broke it in half? That is the magic of chewy chocolate chip cookies. For years, I struggled with cookies that turned out like hard little bricks or, even worse, thin pancakes that shattered on the first bite. It took a lot of flour on my apron and a few burnt batches to realize that baking is actually a cool science experiment.
The secret isn’t just in the ingredients, but in how you treat them. Most people just toss everything in a bowl and hope for the best. But if you want that bakery-style finish, you need to understand why we use certain things. In this guide, I’m going to walk you through my personal kitchen secrets so you can make the best chewy chocolate chip cookies every single time. Get ready to be the hero of your next bake sale or family gathering!
Flour and Flavor: The Cookie Biography
| Detail | Information |
| Main Ingredient | High-quality All-Purpose Flour (or Bread Flour for extra chew) |
| Sweetener | A mix of Light Brown Sugar and Granulated White Sugar |
| Fat Source | Unsalted Butter (Melted for a denser, chewier texture) |
| The “Secret” | Extra Egg Yolk and a touch of Cornstarch |
| Prep Time | 15 Minutes |
| Chill Time | 2 Hours (Minimum) to 24 Hours (Best flavor) |
| Bake Temp | 325°F (163°C) for a slow, even bake |
| Shelf Life | 5 Days in an airtight container |
Why Brown Sugar is Your Best Friend
If you want chewy chocolate chip cookies, you have to talk about sugar. Most recipes use both white and brown sugar. White sugar makes the edges crisp because it helps the cookie spread and brown. But brown sugar is the real MVP for texture. It contains molasses, which is a natural humectant. That’s just a fancy way of saying it loves to hold onto water.
When you use more brown sugar than white sugar, your cookies stay moist even after they cool down. This creates that “bendy” texture we all love. In my kitchen, I usually use a 2:1 ratio of brown to white sugar. It gives the cookies a deep, caramel-like flavor that makes them taste way more expensive than they actually are. Plus, it smells amazing while they are in the oven!
The Magic of Melted Butter
Most old-school recipes tell you to “cream” softened butter and sugar together. This beats air into the dough, making it fluffy and cake-like. But we aren’t making cake; we are making chewy chocolate chip cookies! To get a dense and fudgy center, try using melted butter instead.
Melted butter mixes with the sugars to form a sort of syrup. This prevents too much air from getting trapped. It results in a cookie that is heavy, moist, and perfectly chewy. Just make sure your melted butter has cooled down a bit before you add your eggs. You don’t want to accidentally cook your eggs in the bowl before they even hit the oven!
Why One Extra Egg Yolk Changes Everything
Eggs are the glue that holds your chewy chocolate chip cookies together. A standard large egg provides structure and moisture. However, egg whites can sometimes make cookies a bit more “puffy.” If you want to level up your game, try adding one extra egg yolk to the mix.
The yolk is where all the fat and lecithin live. Adding an extra one makes the dough richer and much chewier. It’s like the difference between a regular brownie and a triple-fudge brownie. It adds a velvety mouthfeel that keeps people coming back for “just one more.” I started doing this a year ago, and I haven’t looked back since.
Why You Must Chill the Dough
I know it’s hard to wait when you have a bowl of delicious dough sitting right there. But chilling your dough is the single most important step for chewy chocolate chip cookies. When the dough is cold, the fat (butter) takes longer to melt in the oven. This means the cookies won’t spread into a giant puddle.
Chilling also allows the flour to fully soak up the liquid from the eggs and butter. This “hydration” makes the flavor much deeper and the texture much more uniform. I recommend chilling for at least two hours, but if you can wait 24 hours, the flavor becomes almost like butterscotch. Trust me, your patience will be rewarded with the best cookie of your life.
Measuring Flour the Right Way
Did you know that “scooping” flour directly with a measuring cup can ruin your bake? It packs the flour down, and you end up using way too much. This leads to dry, crumbly cookies instead of chewy chocolate chip cookies. Instead, use the “spoon and level” method.
Gently spoon the flour into your measuring cup until it’s overflowing, then use the back of a knife to scrape off the excess. This keeps the flour light and airy. If you want to be a real pro, use a digital kitchen scale. Measuring by weight is the only way to be 100% sure your recipe is perfect every time.
The Secret Power of Cornstarch
You might think cornstarch is only for thickening gravy, but it’s a secret weapon for bakers. Adding just a teaspoon or two to your dry ingredients helps create a soft, tender crumb. It works by breaking up some of the gluten bonds in the flour.
In chewy chocolate chip cookies, cornstarch helps the cookie stay thick and prevents it from becoming too tough. It gives the cookie a “pillowy” softness that lasts for days. Even on day three, your cookies will still taste like they just came out of the oven. It’s a small change that makes a massive difference in the final result.
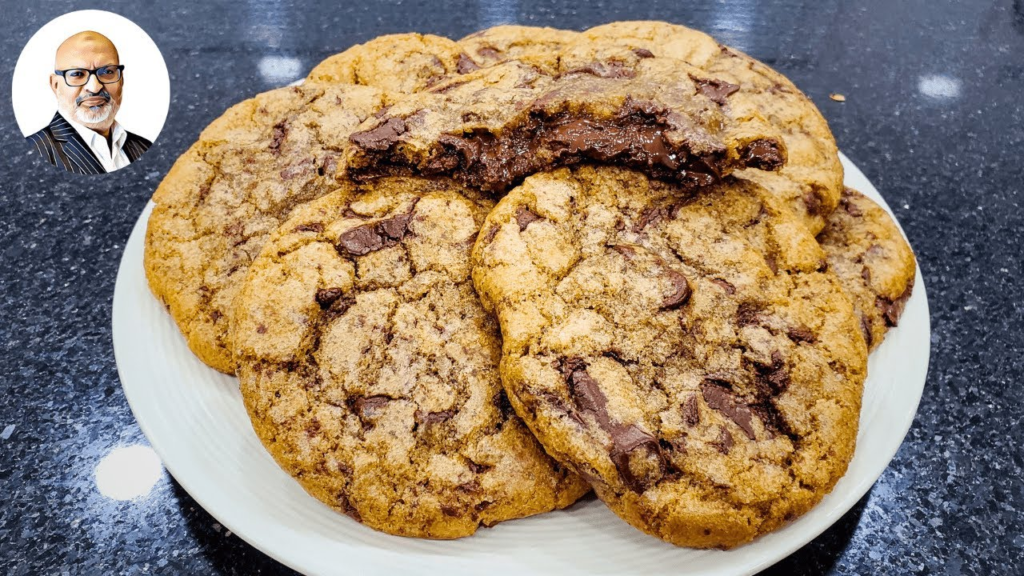
Choosing the Right Chocolate
Not all chocolate is created equal. While standard semi-sweet chips are fine, I love using chopped chocolate bars or “feves” (large chocolate discs). Chocolate chips are designed to hold their shape, which is why they stay in little bumps. Chopped chocolate melts into pools and layers throughout the dough.
When you take a bite of these chewy chocolate chip cookies, you get different textures of chocolate in every mouthful. I like to use a mix of 60% dark chocolate and a little bit of milk chocolate. The bitterness of the dark chocolate balances out the sweetness of the dough perfectly. Don’t be afraid to experiment with different brands until you find your favorite!
Don’t Overmix the Dough!
Once you add your dry ingredients to the wet ones, you need to be very gentle. Overmixing develops gluten, which is great for bread but terrible for chewy chocolate chip cookies. If you mix too much, your cookies will come out tough and bready.
I like to mix until I see just a few streaks of flour left, then I fold in the chocolate chips by hand. This ensures that every bit of flour is incorporated without “working” the dough too hard. Think of it like a gentle hug for your ingredients. The less you mess with it, the softer your cookies will be.
The Underbaking Rule
This is the golden rule of the cookie world: if they look done in the oven, they are overbaked. For chewy chocolate chip cookies, you want to pull them out when the edges are just starting to turn golden brown, but the centers still look a little pale and “underdone.”
Cookies continue to cook on the hot baking sheet for several minutes after you take them out of the oven. This is called “carry-over cooking.” By pulling them out early, you ensure the centers stay soft and gooey. Let them rest on the pan for about 5 to 10 minutes before moving them to a wire rack.
How to Keep Your Cookies Fresh
There is nothing sadder than a stale cookie. To keep your chewy chocolate chip cookies soft, store them in an airtight container as soon as they have cooled down. My favorite trick is to put a single slice of white bread in the container with them.
The cookies will actually pull the moisture out of the bread, keeping them soft for days! If they do happen to get a bit hard, just pop one in the microwave for 10 seconds. It will soften the butter and melt the chocolate, making it taste brand new again. You can also freeze the baked cookies for up to three months!
Frequently Asked Questions
Why are my cookies flat and greasy?
This usually happens if your butter was too hot when you mixed it or if you didn’t chill the dough. Cold dough is the best way to prevent flat chewy chocolate chip cookies. Also, make sure you aren’t using a greased cookie sheet; use parchment paper instead!
Can I use bread flour instead of all-purpose?
Yes! In fact, many professional bakers prefer bread flour for chewy chocolate chip cookies. Bread flour has more protein, which creates more “chew.” If you have some in your pantry, try swapping it 1:1 for a sturdier, chewier bite.
My cookies are cakey, not chewy. What happened?
Cakey cookies usually come from two things: too much egg (specifically the whites) or too much leavening (like baking powder). Stick to baking soda for chewiness and try adding that extra egg yolk instead of a whole second egg.
Does the brand of butter matter?
While any unsalted butter works, higher-fat “European-style” butters make a noticeable difference. They have less water and more fat, which leads to a richer flavor and a more luxurious texture in your chewy chocolate chip cookies.
Can I freeze the dough for later?
Absolutely! I actually recommend making a double batch. Scoop the dough into balls, freeze them on a tray, and then toss them into a freezer bag. You can bake them straight from the freezer—just add an extra minute or two to the baking time!
Why do I need to add salt to a sweet cookie?
Salt is a flavor enhancer. Without it, your chewy chocolate chip cookies will just taste sugary. A little bit of salt balances the sweetness and makes the chocolate flavor “pop.” I even like to sprinkle a little flaky sea salt on top right after they come out of the oven.
Conclusion
Making the perfect batch of chewy chocolate chip cookies is a journey, not a destination. It’s about learning how ingredients work together and finding the specific balance that you love. Whether you like them extra dark and salty or sweet and milky, these tips will give you the foundation you need for success.
Remember to chill that dough, use plenty of brown sugar, and never, ever overbake! Now that you have all the secrets, it’s time to preheat the oven and get baking. Your kitchen is about to smell like heaven, and your friends and family are going to be very, very happy.